Hello, World!
My blog is moving to zoomspeaks.tech, please follow me there.
Hello, World!
My blog is moving to zoomspeaks.tech, please follow me there.
Hello again,
Recently I’ve been playing with Yammer. One of my customers requested a way to bulk import Yammer groups including group membership from their Active Directory. The first part was simply to export their Active Directory group membership data into CSV, something that has been covered in many technical blog posts before so we’re not going to cover it here. The other part was to import the CSV data into Yammer.
The process consists of two major steps. The first step is to login to Yammer using Windows PowerShell by creating an access token. Yammer uses REST API. There is a beautiful blog post by Dave Young that I’ve used here. The second step is the groups creation.
First, let us start by registering a Yammer to be able to generate an access token for Windows PowerShell to use.


The “Token Creator.ps1” which was inspired by Dave Young in his post here goes like this:
$clientID = "KKiVk**********A0lWA"
$clientsecret = "JTINYDBQ********************UUyz4AiNV8xg"
$RedirURL = "https://www.yammer.com/*****.com"

$ie = New-Object -ComObject internetexplorer.application
$ie.Visible = $true
$ie.Navigate2("https://www.yammer.com/dialog/oauth?client_id=$clientID&redirect_uri=$RedirURL")

Sleep 100

$UrlTidy = $ie.LocationURL -match 'code=(......................)';
$Authcode = $Matches[1]
$ie = New-Object -ComObject internetexplorer.application
$ie.Visible = $true
$ie.Navigate2("https://www.yammer.com/oauth2/access_token.json?client_id=$clientID&client_secret=$clientsecret&code=$Authcode")
The script will open a new IE window (requires PowerShell 3.0 or above) and navigate to a special URL that allows your Office365 user account trust the Yammer App you just created. After that, another IE window will appear that will prompt you to download your access token. Download the file and rename it to “access_token.json”.
You can then edit the script “Group Creator.ps1” with the location of the new access token, and the csv file with the following format:

The script will create a group with the specified name and add the semicolon separated users in the “Members” field (user email) as members in the group. In case a “GroupId” was supplied, the script will assume that the group is already created, and will attempt to append the users to the group members.
Note that you can get the group Id of any existing group by navigating to the group’s page and copying the feed Id value from the navigation bar.

The script “Group Creator.ps1” goes like this:
 $TokenPath = 'C:\Workspace\access_token.json'
$CSVPath = 'C:\Workspace\Yammer Groups.csv'

###Reading token###############################################################################################
$Openjson = $(Get-Content $TokenPath ) -join "`n" | ConvertFrom-Json
$token = $Openjson.access_token.token
###############################################################################################################

###Creating header#############################################################################################
$Headers = @{
"Accept" = "*/*"
"Authorization" = "Bearer "+$token
"accept-encoding" = "gzip"
"content-type"="application/json"
}
###############################################################################################################


###Reading groups##############################################################################################
$GroupItems = Import-Csv -Path $CSVPath

foreach ($GroupItem in $GroupItems)
{
###Creating Yammer group#######################################################################################
$Group = $GroupItem.Group

if ($GroupItem.Type -eq 'Private')
{
$GroupType = $true
}
else
{
$GroupType = $false
}

$CreateGroupUri = "https://www.yammer.com/api/v1/groups.json?name=$Group&private=$GroupType"

$CreateGroupResponse = Invoke-RestMethod -Method Post -Uri $CreateGroupUri -Header $Headers
###############################################################################################################

###Enumerating members#########################################################################################
$Members = $GroupItem.Members.Split(';')

foreach ($Member in $Members)
{
###Adding users to Yammer group################################################################################
$GroupID = $CreateGroupResponse.id
$UserEmail = $Member

$GroupMembershipUri = "https://www.yammer.com/api/v1/group_memberships.json?group_id=$GroupID&email=$UserEmail"

$GroupMembershipResponse = Invoke-RestMethod -Method Post -Uri $GroupMembershipUri -Header $Headers
###############################################################################################################
}
###############################################################################################################
}
###############################################################################################################
The script may generate errors if a group with the same name already exists, or the user is already a member of that group. These errors can be ignored.
I hope you can find this useful.
Hazem Elshabini
Update!!! I have created a new image for Windows Server 2016 Standard on WDSentinel DX4000. Get it here…
Instructions are the same, except you can create your USB using USB Image Tool which is far simpler this time. NIC Drivers are also now fully compatible.
Notes:
Hello,
The WD Sentinel (DX 4000) Storage Appliance from Western Digital comes with stock Windows Storage Server 2008, I wanted to upgrade it to Windows Server 2012 R2 Standard to make use of the following features:
However because it is a headless system (does not have a screen), it was virtually impossible to simply upgrade it. Also, for me to be able to keep the Essentials Dashboard (which is only a feature of Windows Server 2012 R2 Essentials) I have to first install Windows Server 2012 R2 Essentials, then upgrade to Windows Server 2012 R2 Standard.
I finally found this awesome guide to perform the upgrade, it depends on Windows Assessment and Deployment Toolkit to create a WinPE image that will automate the installation of Windows Server 2012 R2.
Because those steps are too complex, it is not an easy task for the average person to go through it, I’ve depended on this guide to create an ISO image that will automate the upgrade for you. The ISO image can be downloaded from here.
So simply follow these steps to upgrade your DX4000 to Windows Server 2012 R2 Standard whilst keeping the Essentials Dashboard:
Notes:
Enjoy 🙂
As an Infrastructure Consultant, I’ve dealt a lot with the activity of creating a Hyper-V cluster. Since the release of Windows Server 2012, it has been possible to automate every task in the creation of a cluster. So i have created this script that would help me do that, and i thought I’d share it with you.
Introduction
Creating a Hyper-V Cluster comes with a lot of tips and best practices that you should follow, in order to create the best Hyper-V cluster there is. As the activity of creating the cluster itself might not be that difficult, however all these best practices take a long time to do on all the servers.
Let me shed the light of what this script covers:
I know there are still a lot of things to add, so feel free to write in the comments any additions you can contribute.
#region Functions

function Prepare-NetAdapter
{
    [CmdletBinding()]
    [OutputType([String])]
    Param
    (
        # NetAdapterOldName help description
        [Parameter(Mandatory=$true,
                   ValueFromPipelineByPropertyName=$true,
                   Position=0)]
        [String]
        $NetAdapterOldName,

        # NetAdapterNewName help description
        [Parameter(Mandatory=$true,
                   ValueFromPipelineByPropertyName=$true,
                   Position=1)]
        [String]
        $NetAdapterNewName,

        # NetAdapterIPAddress help description
        [Parameter(Mandatory=$false,
                   ValueFromPipelineByPropertyName=$true,
                   Position=2)]
        [String]
        $NetAdapterIPAddress,

        # NetAdapterPrefixLength help description
        [Parameter(Mandatory=$false,
                   ValueFromPipelineByPropertyName=$true,
                   Position=3)]
        [int]
        $NetAdapterPrefixLength,

        # NetAdapterDefaultGateway help description
        [Parameter(Mandatory=$false,
                   ValueFromPipelineByPropertyName=$true,
                   Position=4)]
        [String]
        $NetAdapterDefaultGateway,

        # NetAdapterDNSServerAddresses help description
        [Parameter(Mandatory=$false,
                   ValueFromPipelineByPropertyName=$true,
                   Position=5)]
        [String]
        $NetAdapterDNSServerAddresses
    )

    Write-Output "Getting Network Adapter"

    $__NetAdapter = Get-NetAdapter -Name $NetAdapterOldName;

    Write-Output "Renaming Network Adapter"

    $__NetAdapter | Rename-NetAdapter -NewName $NetAdapterNewName;

    if (($NetAdapterIPAddress) -and ($NetAdapterPrefixLength) -and ($NetAdapterDefaultGateway))
    {
        Write-Output "Setting Network Adapter IP Address"

        $__NetAdapter = Get-NetAdapter -Name $NetAdapterNewName
        $__NetAdapter | Set-NetIPInterface -Dhcp Disabled
        $__NetAdapter | New-NetIPAddress -IPAddress $NetAdapterIPAddress -PrefixLength $NetAdapterPrefixLength
    }

    if ($NetAdapterDNSServerAddresses)
    {
        Write-Output "Setting Network Adapter DNS Addresses"
        Set-DnsClientServerAddress -InterfaceAlias $NetAdapterNewName -ServerAddresses $NetAdapterDNSServerAddresses
    }
}

function Prepare-ClusterNode
{
    Write-Output "Adding Windows Features"

    Add-WindowsFeature Multipath-IO
    Add-WindowsFeature Hyper-V -IncludeManagementTools
    Add-WindowsFeature Failover-Clustering -IncludeManagementTools
    Add-WindowsFeature RSAT-Clustering –IncludeAllSubFeature

    Write-Output "Restarting Server"

    Restart-Computer -Force
}

function Create-HyperVCluster
{
    [CmdletBinding()]
    [OutputType([String])]
    Param
    (
        # ClusterName help description
        [Parameter(Mandatory=$true,
                   ValueFromPipelineByPropertyName=$true,
                   Position=0)]
        [String]
        $ClusterName,

        # ClusterNodes help description
        [Parameter(Mandatory=$true,
                   ValueFromPipelineByPropertyName=$true,
                   Position=1)]
        [String[]]
        $ClusterNodes,

        # ClusterIPAddress help description
        [Parameter(Mandatory=$true,
                   ValueFromPipelineByPropertyName=$true,
                   Position=2)]
        [String]
        $ClusterIPAddress,

        # HeartbeatNetworkSubnet help description
        [Parameter(Mandatory=$false,
                   ValueFromPipelineByPropertyName=$true,
                   Position=3)]
        [String]
        $HeartbeatNetworkSubnet,

        # HeartbeatNetworkName help description
        [Parameter(Mandatory=$false,
                   ValueFromPipelineByPropertyName=$true,
                   Position=4)]
        [String]
        $HeartbeatNetworkName,

        # CSVNetworkSubnet help description
        [Parameter(Mandatory=$false,
                   ValueFromPipelineByPropertyName=$true,
                   Position=5)]
        [String]
        $CSVNetworkSubnet,

        # CSVNetworkName help description
        [Parameter(Mandatory=$false,
                   ValueFromPipelineByPropertyName=$true,
                   Position=6)]
        [String]
        $CSVNetworkName,

        # LiveMigrationNetworkSubnet help description
        [Parameter(Mandatory=$false,
                   ValueFromPipelineByPropertyName=$true,
                   Position=7)]
        [String]
        $LiveMigrationNetworkSubnet,

        # LiveMigrationNetworkName help description
        [Parameter(Mandatory=$false,
                   ValueFromPipelineByPropertyName=$true,
                   Position=8)]
        [String]
        $LiveMigrationNetworkName,

        # ManagementNetworkSubnet help description
        [Parameter(Mandatory=$false,
                   ValueFromPipelineByPropertyName=$true,
                   Position=9)]
        [String]
        $ManagementNetworkSubnet,

        # ManagementNetworkName help description
        [Parameter(Mandatory=$false,
                   ValueFromPipelineByPropertyName=$true,
                   Position=10)]
        [String]
        $ManagementNetworkName,

        # DiskOnly help description
        [Parameter(Mandatory=$false,
                   PositionalBinding=$false)]
        [String]
        $DiskOnly,

        # NodeAndDiskMajority help description
        [Parameter(Mandatory=$false,
                   PositionalBinding=$false)]
        [String]
        $NodeAndDiskMajority,

        # NodeAndFileShareMajority help description
        [Parameter(Mandatory=$false,
                   PositionalBinding=$false)]
        [String]
        $NodeAndFileShareMajority,

        # ClusterQuorum help description
        [Parameter(Mandatory=$false,
                   PositionalBinding=$false)]
        [SwitchParameter]
        $NodeMajority
    )
    Write-Output "Importing Fail-over Cluster module"

    Import-Module FailoverClusters;

    Write-Output "Creating new cluster"

    New-Cluster -Name $ClusterName -Node $ClusterNodes–StaticAddress $ClusterIPAddress -NoStorage

    Write-Output "Waiting 10 seconds for the cluster to initialize"

    Start-Sleep -s 10

    Write-Output "Configuring quorum"

    if ($DiskOnly)
    {
        Set-ClusterQuorum -DiskOnly $DiskOnly
    }
    elseif ($NodeAndDiskMajority)
    {
        Set-ClusterQuorum -NodeAndDiskMajority $NodeAndDiskMajority
    }
    elseif ($NodeAndFileShareMajority)
    {
        Set-ClusterQuorum -NodeAndFileShareMajority $NodeAndFileShareMajority
    }
    else
    {
        Set-ClusterQuorum -NodeMajority
    }

    Write-Output "Renaming the cluster networks"

    (Get-ClusterNetwork | where-object {$_.Address -eq $HeartbeatNetworkSubnet}).Name = $HeartbeatNetworkName
    (Get-ClusterNetwork | where-object {$_.Address -eq $CSVNetworkSubnet}).Name = $CSVNetworkName
    (Get-ClusterNetwork | where-object {$_.Address -eq $LiveMigrationNetworkSubnet}).Name = $LiveMigrationNetworkName
    (Get-ClusterNetwork | where-object {$_.Address -eq $ManagementNetworkSubnet}).Name = $ManagementNetworkName

    Write-Output "Setting metric for CSV cluster network"

    (Get-ClusterNetwork $CSVNetworkName).Metric=900;
}

#endregion

$Credential = Get-Credential
$ClusterNodes = Import-Csv ClusterNodes.csv
$NetAdapters = Import-Csv NetAdapters.csv
$Servers = ($ClusterNodes | Select-Object Name | Foreach-Object { $_.Name })

foreach ($Node in $ClusterNodes)
{
    $NodeNetAdapters = $NetAdapters | Where-Object { $_.Node -eq $Node.Name }

    foreach ($NetAdapter in $NodeNetAdapters)
    {
        Invoke-Command -ComputerName $Node.Name -Credential $Credential -ScriptBlock ${function:Prepare-NetAdapter} -ArgumentList $NetAdapter.NetAdapterOldName,$NetAdapter.NetAdapterNewName,$NetAdapter.NetAdapterIPAddress,$NetAdapter.NetAdapterPrefixLength
    }
}

Invoke-Command -ComputerName $Servers -Credential $Credential -ScriptBlock ${function:Prepare-ClusterNode}

Start-Sleep -Seconds 360

Invoke-Command -ComputerName $Servers -Credential $Credential -ScriptBlock ${function:Create-HyperVCluster} -ArgumentList "Servers-Cluster",$Servers,"10.40.30.230","222.222.222.0","Heartbeat","222.222.223.0","CSV","222.222.224.0","LiveMigration","10.40.30.0","Management"
How to use
And you’re good to go, let me know how it works out.
Hello again 🙂
Introduction
As promising as System Center Orchestrator is with all the Integration Packs that are being developed every day, there still are some gaps to fill to be able to compete in specific scenarios in the real world.
One of these gaps that needs to be filled is automating SSH, Telnet, and Batch scripts.
Background
System Center Orchestrator ships with an activity called “Run SSH Command”, which is great for executing a single command, or a script file to a Unix/Linux machine. While this is great for executing straight forward commands and scripts, it lacks the ability to interact with the shell and maybe execute different options or commands based on how this script actually goes. Or maybe, the script is expected to ask for a username and password to connect to a FTP server, how then would you supply these inputs, without actually changing the script itself?
Other technologies, like for example HP’s Operations Orchestration, has introduced the use of what is known as “Expect Scripts”, which would simply guide the shell into sending different commands once it has recognized certain text or regular expression in the StdOut of the shell.
For example it would go something like this:
expect "*name:"
send "hello\r"
expect "*name:"
send " world!\r"
expect "*$"
This expect script for example would reply to a couple of prompts asking the user for first and last name within the script.
While the “Expect Script” methodology is not very well documented, it is available in many incarnations, one of which exists as a feature in a tool called “ActiveTcl”.
ActiveTcl is a “Tool Command Language”, which is some sort of a scripting language that is dedicated to controlling and commanding other tools. While Tcl as a concept is a little beyond the scope of this article, we must understand some basic concepts about the role Tcl plays in our little scenario.
So bear with me a little longer with this introduction, it will make things easier afterwards.
Behind the scenes, System Center Orchestrator user plink (PuTTY) to execute SSH Commands using the “Run SSH Command” activity, so we will do the same, since PuTTY is a very dependable SSH/Telnet client, you could use any incarnation of OpenSSH if you prefer.
However, in order to add the “Expect Script” functionality to our flows, we will not directly call (PuTTY) from our workflows. Instead, we will call Tcl and instruct it to call PuTTY with the required command and parameters.
Required Tools
Known Limitations
Preparation
First off, let us start with installing our required software on our Runbook server(s).
Installing PuTTY:
Installing ActiveTcl:
Scenario
Now, let us get started with the actual runbook authoring. We want to create something with the following logic:

“Construct TCL File” will write a TCL file to disk, the contents of that file, will instruct ActiveTcl to execute a new process of PuTTY with specific parameters, and run the Expect sequence on it.
The contents of the TCL file are written in Tcl language, which is not our concern at the moment, however you may find everything you need to know about it at C:\Tcl\doc, the file should look something like this:
#!/bin/sh
# \
exec tclsh "$0"  ${1+"$@"}

# This is required to declare that we will use Expect
package require Expect

array set OPTS {
    host    ""
    port    22
    user    ""
    passwd  ""
    command ""
    timeout 30
}

proc parseargs {argc argv} {
    # Parse the command line arguments
    global OPTS
    foreach {key val} $argv {
	switch -exact -- $key {
	    "-host"     { set OPTS(host)        $val }
	    "-port"     { set OPTS(port)        $val }
	    "-user"     { set OPTS(user)        $val }
	    "-passwd"   { set OPTS(passwd)      $val }
	    "-command"  { set OPTS(command)     $val }
	    "-timeout"  { set OPTS(timeout)     $val }
	}
    }
}

parseargs $argc $argv

set timeout $OPTS(timeout)
spawn plink -t -ssh $OPTS(host) -P $OPTS(port) -l $OPTS(user) -pw $OPTS(passwd) $OPTS(command)

expect "*name:"
send "hello\r"
expect "*name:"
send " world!\r"
expect "*>"
After the file has been written to disk, we will use ActiveTcl’s tclsh.exe to execute the file, this will spawn the PuTTY terminal and execute the command and the expect sequence in the background.
Runbook Design
Now, let us get started with the runbook design in Orchestrator. And create the following directory tree in Runbook Designer.

Now right click the folder “0.Construct Tcl File” and select “New > Runbook”. Rename the runbook to “Construct Tcl File”. This runbook will simply use a default Tcl file that we will prepare, and copy it for our specific use. It will then replace a placeholder for the expect script with the Expect Script given to it as input .
Right click the runbook tab and choose properties to open the runbook properties. Go to the “Returned Data” tab and add a new output value for this runbook as follows:

Drag and drop the following 4 Activities in the runbook area:

And here are the properties of these activities in sequence for you to replicate:
Initialize Data:

Copy File:
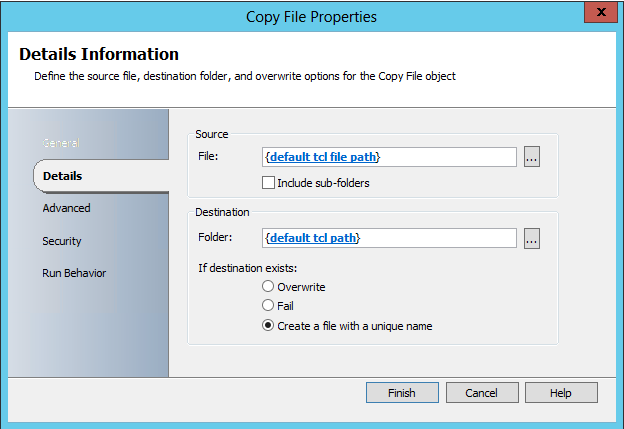
Note that i have created variables called:
Which are currently set to:
![]()
Search And Replace Text:

Return Data:

Now for all this to work, we need to have the file “C:\Tcl\scorch\default.tcl” in place, so go ahead and navigate to “C:\Tcl\” and create a directory called “scorch” which we will use to save our files. Create a new text file and rename it default.tcl with the following contents:
#!/bin/sh
# \
exec tclsh "$0"  ${1+"$@"}

# This is required to declare that we will use Expect
package require Expect

array set OPTS {
    host    ""
    port    22
    user    ""
    passwd  ""
    command ""
    timeout 30
}

proc parseargs {argc argv} {
    # Parse the command line arguments
    global OPTS
    foreach {key val} $argv {
	switch -exact -- $key {
	    "-host"     { set OPTS(host)        $val }
	    "-port"     { set OPTS(port)        $val }
	    "-user"     { set OPTS(user)        $val }
	    "-passwd"   { set OPTS(passwd)      $val }
	    "-command"  { set OPTS(command)     $val }
	    "-timeout"  { set OPTS(timeout)     $val }
	}
    }
}

parseargs $argc $argv

set timeout $OPTS(timeout)
spawn plink -t -ssh $OPTS(host) -P $OPTS(port) -l $OPTS(user) -pw $OPTS(passwd) $OPTS(command)

${expect}
Note the “${expect}” at the bottom of the file, this value will be replaced by our “Search And Replace Text” activity with the input “Expect Scripts” value from “Initialize Data”.
I am aware that the Initialize Data” activity will not allow you to input multi-line text for any of its inputs, however we can always separate our expect script using semicolons, or have it read from another file altogether, or you can actually use a Run .Net Activity which will enable you to edit the file in multi-line text… It is really up to you how you want to approach this. I like this way because it enables me to create a re-usable flow that i can just invoke with different parameters each time. The hassle of writing the expect script doesn’t bother me so much because you can always manipulate the script manually in the tcl file until it works then just replace the line breaks with semi colons manually.
Test your flow, so far this part should be able to create new Tcl files based on different expect scripts, and output the created file name.
Now, let us get started with calling the the actual command which will do the magic. Right click the folder “1.Execult Tcl File” in your Runbook Designer and create a new flow named “Execute Tcl File”.
Drag the following activities on the runbook area:
It should look something like this:

For the Initialize Data activity, here are the properties:

And for the “Run Program” activity:

Note that the parameters for the command are as follows:
"{Tcl File from Initialize Data}" -host {Host from Initialize Data} -port {Port from Initialize Data} -user {Username from Initialize Data} -passwd {Password from Initialize Data} -command "{Command from Initialize Data}" -timeout {Timeout from Initialize Data}
And that’s it for this runbook. Now create the main runbook in the “Run SSH Command (Tcl)” folder, and drag a couple of “Invoke Runbook” activities. It should looks something like this:

Conclusion
There are many alternative and many ways to go to accomplish the same thing, let me list some examples here:
sudo apt-get install expect
sudo apt-get install expect-dev
This will also install “Autoexpect” for you, which a tool that will generate an expect script for you for any given script.
Sources
You can check these great sources for more info regarding this subject:
Let me know how it works out 🙂
Hello again,
Today’s topic is a little advanced, and needs a bit of experience with Orchestrator and Service Manager, but I will try to explain as much as I can anyways.
System Center Service Manager 2012 gives you the ability to create ‘Request Offerings’ and publish them to the ‘SM Portal’. A request offering will allow you to collect user input via the portal, and map the data you collected via the portal to fields on your ‘Service Request’ or ‘Incident’ and any of their child ‘Activities’.
To learn more about ‘Service Offerings’ and ‘Request Offerings’ before going any further, please check out these two blog posts by Kurt Van Hoecke and Travis Wright:
http://blogs.technet.com/b/servicemanager/archive/2011/11/08/request-offering-wizard-overview.aspx
This might sound straight forward, however one limitation is that you cannot bind the results of ‘Query Result’ prompts directly to a field. As the ‘Query Result’ prompt will let the user choose either a ‘Work Item’ or a ‘Configuration Item’, and those are complex types. SCSM has no idea how to bind those types to a field.
So this is where we’re going to come in with a bit of System Center Orchestrator magic. To extract the values of the ‘User Input’ from the ‘Service Request’.
First of all let’s take a look at how a ‘Service Request’ saves the ‘User Input’ value. If you try to query a ‘Service Request’ via PowerShell, the ‘User Input’ will be generated as XML text. Containing all the prompts and their results as defined in the ‘Request Offering’. A Typical ‘User Input’ would look something like this:
As you can see from the XML, the ‘User Input’ value consists of a main tag ‘<UserInputs>’ which has many child tags ‘<UserInput>’, one for each prompt defined in your ‘Request Offering’.
The ‘<UserInput>’ tag has three attributes: Question, Answer and Type. The ‘Question’ attribute is the name of the prompt as defined in the ‘Request Offering’, the ‘Answer’ attribute holds the value chosen by the user in the portal. The ‘Type’ attribute tells Service Manager what is the class type that this ‘Answer’ attribute is holding, may it be a number, rich text, enum, or as in our case it would hold the a user or group value from the people picker control.
For complex types, like the ones are generated when the prompt is designed to hold ‘Query Results’, the ‘Answer’ attribute will actually hold more XML data, containing the count, display name, and Id of each item chosen by this prompt (because ‘Query Result’ prompts support multiple selection.
So basically what we will do is build an Orchestrator Runbook, to help us get the Ids of the items chosen by the ‘Query Results’ control. A typical use for that is you can later use those Ids to get certain ‘Configuration Items’ using them, thus performing automation for the service request once it has been created.
First, start by firing up the ‘Runbook Designer’ and create a new folder for your runbook, then create a new runbook.
Drag an ‘Initialize Data’ activity from the ‘Runbook Control’ tab on the right. Configure it to receive two inputs:

Now, drag a ‘Get Object’ activity from the SC Service Manager 2012 integration pack tab, and configure it as shown below.


Now, open the ‘Utilities’ tab from the right pane in ‘Runbook Designer’ and drag two ‘Query XML’ activities.
We will call the first one ‘Get Raw Answer’ to get the whole ‘Answer’ attribute to the ‘Question’ and we will call the second one ‘Get Guid Answer’ to further parse the XML inside the answer and get the ‘Id’ values of the chosen ‘Query Results’
For the ‘Get Raw Answer Activity’, configure it as shown below:
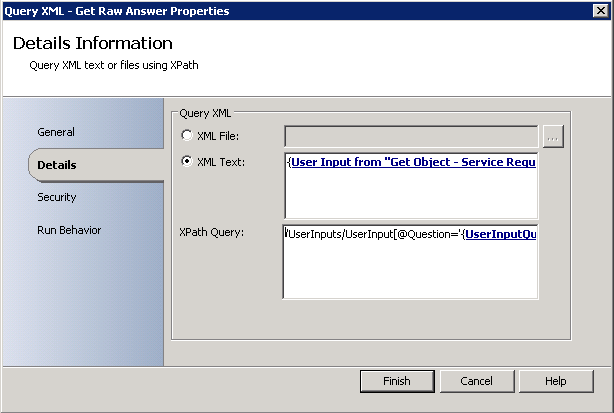
As you can see, I have set the ‘XML Text’ value to get the ‘User Input’ from the ‘Get Service Request’ activity. And also set the ‘XPath Query’ value to the following:
/UserInputs/UserInput[@Question='{UserInputQuestion from Initialize Data}']/@Answer
This ‘XPath Query’ will extract the ‘Answer’ attribute for the specified ‘Question’ from the ‘User Input’ XML.
Now for the ‘Get Guid Answer’ activity, configure it as follows:

I have set the ‘XML Text’ value to the ‘Query Results’ from the previous activity ‘Get Raw Answer’, this will parse the XML inside the ‘Answer’.
And the ‘XPath Query’ value to
//@Id
Which will return the Id value for each of the ‘Values’ chosen in the ‘Query Results’ so we might get multiple responses from this activity.
So far the runbook should look something like this:

Now let’s define some output for our runbook, I have chosen the output to be as follows:
So let’s define our returned data for this ‘Runbook’, right click the tab that has the runbook name above and choose ‘Properties’

Go to the ‘Returned Data’ tab and configure your runbook output as follows:

Now the next part is the trickiest, because you can have two kinds of answers. It’s either a valid Guid or just a Raw answer, you will be able to determine so by checking whether the ‘Get Guid Answer’ activity fails or succeeds, if the activity fails, then it failed to get a valid Guid from the ‘//@Id‘ XPath Query. If it succeeds, then the XPath Query found Id attribute(s) within the provided XML.
Now from the ‘Runbook Control’ tab on the right, drag two ‘Return Data’ activities, and place them as follows:

Notice that I have added link coloring and description so I would be able to refer to the links by name.
For each of the ‘Return Data’ activities, please apply the following configuration.
For the ‘Return Data – Raw’ activity:

I have set the ‘Returned Data’ as follows:
For the ‘Return Data – Guid’ activity, set the following configuration:

For this activity, I have set the ‘Returned Data’ as follows:
The next step is telling Orchestrator, to which activity it should direct the flow, I have configures the link named ‘Guid Answer Failed’ which should direct me to the ‘Return Data – Raw’ activity as follows:

To do the same just double click the ‘Guid Answer Failed’ link, go to the ‘Include’ tab, and set it to include results where ‘Get Guid Answer’ returns failed.
On the other link, named ‘Guid Answers > 0’ configure it as follows:


I have set the ‘Include’ tab to include results where ‘Get Guid Answer’ return success, and the ‘Exclude’ tab to exclude results where the ‘Number of matches’ from ‘Get Guid Answer’ equals 0. This is because I want to make sure that you only return a Guid if there are any returned from the activity.
Now just to make sure that the flow is not error prone, I will add some other conditions and link coloring to some of the links, that I don’t want to bore you with.
So the final runbook looks like this:

Now you can check in the runbook, and create another runbook to test it, using the ‘Invoke Runbook’ activity from the ‘Runbook Control’ tab.
Here are the test results of the runbook with different inputs:
| Input | Output |
|
|
|
|
|
|
Good luck creating your own,
Hazem Elshabini
Geeks,
System Center 2012 R2 jump start videos are out, grab yours from here.
Mid Quality:
01 | Introduction to the Cloud OS
02 | Infrastructure Provisioning
03 | Infrastructure Monitoring
04 | Application Performance Monitoring
05 | Automation and Self-Service
High Quality:
01 | Introduction to the Cloud OS
02 | Infrastructure Provisioning
03 | Infrastructure Monitoring
04 | Application Performance Monitoring
05 | Automation and Self-Service
Slides:
01 | Introduction to the Cloud OS
02 | Infrastructure Provisioning
03 | Infrastructure Monitoring
04 | Application Performance Monitoring
05 | Automation and Self-Service
Or you can watch the videos directly via the Microsoft Virtual Academy website.
Hello again,
After having to deal with a lot of notifications in System Center Service Manager 2012, I thought I could illustrate the main differences between the two ways of sending notification emails.
Both Subscriptions and Workflows are translated into ‘Rules’ in the SCSM database, these rules are evaluated each time an object is created, updated or upon a certain period. So keep in mind, when it comes to rules, the less the better.
| Comparison area | Notification Subscriptions | Notification Workflows |
| Scope | Subscriptions can be scoped to a certain ‘Queue’ of Work Items. | Workflows automatically apply to all instances of a specific Work Item. |
| Diversity | Subscriptions can be created for any kind of instance in SCSM 2012, including Configuration Items as well as Work Items. | Workflows can only be created for instances of these base classes and their extensions:
· Activity · Change Request · Incident · Configuration Baseline · Release Record · Service Request
You can easily tell that you cannot even create a workflow for instances of the ‘Problem’ class |
| Events | Unlike workflows, subscriptions add the ability to send periodical notifications as long as an object meets a specific criteria.
For example: You can create a notification subscription to keep notifying the service desk about incidents that are breaching your SLA. |
Workflows can be only triggered in the following two events:
· An object is created (optionally with specific criteria) · An object is Updated (optionally from/to specific criteria) |
| Functionality | Subscriptions do not have any functionality other than notifications. | Unlike subscriptions, Workflows give you the ability to apply templates to the objects that trigger them. Giving you a way to change any property of that object.
For example: You can create a workflow to automatically set an incident’s ‘Status’ to ‘Resolved’ when a certain field contains ‘Resolved’ keyword, by applying a template of the incident class with the ‘Status’ pre-set to ‘Resolved’. |
| Static Recipients | Subscriptions have the ability to include static recipients to send the notification to. There static recipients are chosen from SCSM’s Configuration Items. | Workflows cannot send notifications to static recipients, all the possible recipients must be directly related to the object that triggered the workflow. |
| Related Recipients | When it comes to recipients, Subscriptions give you a much larger functionality than workflows in that area.
Subscriptions have the ability to choose a User recipient directly related to the object that triggered it, or from any of the User objects that has a relation with other objects with the object triggering the subscription.
For example: You can create a subscription to send a notification to the ‘Assigned To User’ of the ‘Change Request’ which has a ‘Contains Activity’ relationship with the ‘Activity’ triggering the subscription. |
Workflows can only send notifications to the User recipients which are directly related to the triggering object. |
| Notification Templates | One drawback of subscriptions, is that you can only choose one ‘Notification Template’ per subscription. Thus preventing you from sending multiple notifications to multiple recipients, each with a different notification template.
The workaround is to repeat the creation of each subscription once for each template, which can be tedious especially if you decide to change the selection criteria later, as well as the unnecessary rules that are created in the database. |
Workflows allow you to choose multiple recipients, each with their own notification template.
For example: you can create a workflow, that when an incident is created, send a notification to ‘Affected User’ using ‘Notification Template A’, and also send a notification to ‘Assigned To User’ using ‘Notification Template B’, all with the same trigger.
The benefit is that way you can customize your notification templates to be much more personal to the recipient, thus including something like “Dear Affected User’. |
And I think that sums it up. Will keep you guys posted in case I find any more differences 🙂
Hello,
I ran across something during a SCSM 2012 implementation, thought someone else might find use for it.
For some reason, there is no way to create notification subscriptions that are triggered when the “Assigned To User” of a work item changes from the GUI.
After some digging around I found out that this feature is indeed available in SCSM, just not from the GUI, so you are going to have to do some XML editing.
So here is the simplest way I could do this…
First let’s focus on what information do we need to collect to be able to make this work.
1- The name of the relationship you are trying to subscribe to. (For example: Assigned To User)
2- The name of the source class, which is basically your work item that you want this to apply to (For example: Activity)
3- The name of the target class, which in our case is what kind class do you expect to be on the other end of this relationship (For example: User)
Now the actual values in XML might vary from one environment to another, this is why I cannot just upload a MP that does that for you. So here are the steps to do this on your environment.
1- Go to the ‘Administration’ pane, expand ‘Notifications’, and click on ‘Templates’, and have a notification template ready, because once you do this you will not be able to change the notification template for the subscription.

2- Go to the ‘Administration’ pane, expand ‘Notifications’, and click on ‘Subscriptions’, and click on ‘Create Subscription’ on the ‘Tasks’ pane. And create a new subscription for the ‘Manual Activity’ class. And specify the ‘When to Notify’ as ‘When an object of the selected class is updated’.

Note: Make sure you create a new Management Pack specifically for Relationship Subscriptions; preferably one for each, because it will later be easier to track down and update.
3- On the ‘Additional Criteria’ tab, Set ‘Changed From’ condition to anything. Just pick anything like ‘Status’ equals ‘Pending’ for example. This will later be replaced manually, but we need it to get a hold of the source class (Activity) in the XML.

4- Now go ahead an press ‘Next’, and choose the notification template you created earlier. And keep pressing ‘Next’ will you get to the ‘Related Recipient’ tab.
Now in our case, the source class is the ‘Activity’ itself. The target class is the a ‘User’. And the relationship class is the ‘Assigned To User’.
So I will choose to create just one ‘Related Recipient’ as follows:

Note: Why did I choose this recipient specifically, because it has a reference to the relationship and target classes that I need. Had I needed a different target class for example that does not happen to be a user, I would have had to create another related recipient specifically for that. All I actually care about here is getting the references of these objects in the XML.
5- Now don’t forget to add any other recipients you actually need to notify 🙂 because like the template you chose, those cannot be changed later as well. Unless of coarse with more manual editing.
6- Now after you are done with the subscription, simple go the ‘Administration’ pane, and click on ‘Management Packs’ then export the Management Pack you have saved this newly created subscription in.
7- Open the XML file you just exported with any text editor. Now let’s collect our class references from it before we start modifying.
Search for the following text in your XML:
<WorkflowArrayParameter Name="PrimaryUserRelationships" Type="string">
The following lines are the ‘Related Recipients’ you have chosen in the wizard. Now from these lines, extract the class references for your relationship and target classes.
For example:
My Relationship Class: CustomSystem_WorkItem_Library!System.WorkItemAssignedToUser
My Target Class: CustomSystem_Library!System.User
Great! you delete whatever ‘Related Recipients’ you do not need from the XML. And leave the others intact.
8- Now search the XML again for this portion:
<InstanceSubscription Type="7ac62bd4-8fce-a150-3b40-16a39a61383d">
<UpdateInstance>
  <Criteria>
	<Expression>
	  <SimpleExpression>
		<ValueExpression>
		  <Property State="Pre">$Context/Property[Type='CustomSystem_WorkItem_Activity_Library!System.WorkItem.Activity']/Status$</Property>
		</ValueExpression>
		<Operator>Equal</Operator>
		<ValueExpression>
		  <Value>{50c667cf-84e5-97f8-f6f8-d8acd99f181c}</Value>
		</ValueExpression>
	  </SimpleExpression>
	</Expression>
  </Criteria>
</UpdateInstance>
</InstanceSubscription>
Note the name of the source class, for example mine is:
CustomSystem_WorkItem_Activity_Library!System.WorkItem.Activity
Then, replace this whole portion with the following:
<RelationshipSubscription RelType="$MPElement[Name='CustomSystem_WorkItem_Library!System.WorkItemAssignedToUser']$" SourceType="$MPElement[Name='CustomSystem_WorkItem_Activity_Library!System.WorkItem.Activity']$" TargetType="$MPElement[Name='CustomSystem_Library!System.User']$">
  <AddRelationship />
</RelationshipSubscription>
Now note that I have put my relationship, source and target class references that I have collected in the little snippet as shown.
9- Finally, go to the top of the XML file, and increment the version number of this Management Pack inside the tag, this is a best practice but it won’t really matter.
10- Re-import the Management Pack to your service manager, and you are done! 🙂 Now whenever the ‘Assigned To User’ within any ‘Activity’ is changed, the ‘Assigned To User’ should get a notification email based upon your template.
Till next time 🙂
Hello,
It’s been a long time, but not always does one create something that is worth sharing 🙂
I have been playing with System Center Virtual Machine Manager 2012 since the Beta was released, and I love it.
There were however some problems which are still inherited from the 2008 R2 version.
One problem was failure to remove a host, or a host cluster from the SCVMM database.
Unlike the 2008 R2 version, I searched around and i found no database scripts available which can help me clean the SCVMM 2012 database, so i decided to create my own.
Here is the explanation and some stuff you should know.
My Setup:
How the script works:
Basically the script runs through the VMM Database, deleting all entries of the hosts and any data related to them.
The script also checks to see whether this host is the last host in the cluster, if this host is indeed the last one, it will also remove the cluster and all its related data.
The script however does not do the following:
This is basically because you can manually delete them using the VMM console once it is up and running again.
How to use the script:
The Script:
USE ;

DECLARE @DeleteHostId GUID;
SET @DeleteHostId = ''

PRINT N'Deleting host with GUID ' + RTRIM(CAST(@DeleteHostID AS nvarchar(50)))

PRINT N'Getting host cluster GUID'

DECLARE @HostClusterID GUID;
SET @HostClusterID =
(
SELECT HostClusterID FROM [dbo].[tbl_ADHC_Host]
WHERE HostID = @DeleteHostId
)

IF (@HostClusterID IS NOT NULL)
PRINT N'Retreived host cluster GUID ' + RTRIM(CAST(@HostClusterID AS nvarchar(50)))
ELSE
PRINT N'This host does not belong to a cluster'

PRINT N'Deleteing physical objects'

DELETE FROM [dbo].[tbl_WLC_PhysicalObject]
WHERE HostId = @DeleteHostId

PRINT N'Deleteing virtual objects'

DELETE FROM [dbo].[tbl_WLC_VObject]
WHERE HostId = @DeleteHostId

PRINT N'Prepairing to delete host network adapters'

DECLARE @HostNetworkAdapterCursor CURSOR;
DECLARE @HostNetworkAdapterID GUID;
SET @HostNetworkAdapterCursor = CURSOR FOR
(SELECT NetworkAdapterID FROM [dbo].[tbl_ADHC_HostNetworkAdapter])

OPEN @HostNetworkAdapterCursor

FETCH NEXT FROM @HostNetworkAdapterCursor INTO @HostNetworkAdapterID

WHILE (@@FETCH_STATUS = 0)
BEGIN
PRINT N'Prepairing to delete host network adapter with GUID ' + RTRIM(CAST(@HostNetworkAdapterID AS nvarchar(50)))

PRINT N'Deleting logical network mapping for host network adapter with GUID ' + RTRIM(CAST(@HostNetworkAdapterID AS nvarchar(50)))

DELETE FROM [dbo].[tbl_NetMan_HostNetworkAdapterToLogicalNetwork]
WHERE HostNetworkAdapterID = @HostNetworkAdapterID

PRINT N'Deleting IP subnet VLAN mapping for host network adapter with GUID ' + RTRIM(CAST(@HostNetworkAdapterID AS nvarchar(50)))

DELETE FROM [dbo].[tbl_NetMan_HostNetworkAdapterToIPSubnetVLan]
WHERE HostNetworkAdapterID = @HostNetworkAdapterID

FETCH NEXT FROM @HostNetworkAdapterCursor INTO @HostNetworkAdapterID
END

CLOSE @HostNetworkAdapterCursor
DEALLOCATE @HostNetworkAdapterCursor

PRINT N'Completing host network adapters deletion'

DELETE FROM [dbo].[tbl_ADHC_HostNetworkAdapter]
WHERE HostID = @DeleteHostId

PRINT N'Deleting virtual networks'

DELETE FROM [dbo].[tbl_ADHC_VirtualNetwork]
WHERE HostID = @DeleteHostId

PRINT N’Deleting virtual switch extensions’

DELETE FROM [dbo].[tbl_NetMan_InstalledVirtualSwitchExtension]
WHERE HostID = @DeleteHostId

PRINT N'Deleting host volumes'

DELETE FROM [dbo].[tbl_ADHC_HostVolume]
WHERE HostID = @DeleteHostId

PRINT N’Deleting pass through disks’

DELETE FROM [dbo].[tbl_WLC_VDrive]
WHERE HostDiskId IN (SELECT DiskID FROM [dbo].[tbl_ADHC_HostDisk] WHERE HostID IN (SELECT HostID FROM [dbo].[tbl_ADHC_Host] WHERE HostID = @DeleteHostId))

PRINT N'Deleting host disks'

DELETE FROM [dbo].[tbl_ADHC_HostDisk]
WHERE HostID = @DeleteHostId

PRINT N'Prepairing to delete host bus adapters'

DECLARE @HostBusAdapterCursor CURSOR;
DECLARE @HostBusAdapterID GUID;
SET @HostBusAdapterCursor = CURSOR FOR
(SELECT HbaID FROM [dbo].[tbl_ADHC_HostBusAdapter])

OPEN @HostBusAdapterCursor

FETCH NEXT FROM @HostBusAdapterCursor INTO @HostBusAdapterID

WHILE (@@FETCH_STATUS = 0)
BEGIN

PRINT N'Prepairing to delete host bus adapter with GUID ' + RTRIM(CAST(@HostBusAdapterID AS nvarchar(50)))

PRINT N'Deleting fiber port mapping for host bus adapter with GUID ' + RTRIM(CAST(@HostBusAdapterID AS nvarchar(50)))

DECLARE @FiberPortID GUID;
SET @FiberPortID =
(
SELECT PortID FROM [dbo].[tbl_ADHC_FCHbaToFibrePortMapping]
WHERE FCHbaID = @HostBusAdapterID
)

DELETE FROM [dbo].[tbl_ADHC_FCHbaToFibrePortMapping]
WHERE FCHbaID = @HostBusAdapterID

PRINT N'Deleting fiber port with GUID ' + RTRIM(CAST(@FiberPortID AS nvarchar(50)))

DELETE FROM [dbo].[tbl_ADHC_FibrePort]
WHERE PortID = @FiberPortID

PRINT N'Deleting fiber channel mapping for host bus adapter with GUID ' + RTRIM(CAST(@HostBusAdapterID AS nvarchar(50)))

DELETE FROM [dbo].[tbl_ADHC_HostFibreChannelHba]
WHERE FCHbaID = @HostBusAdapterID

PRINT N'Deleting any iSCSI entries for host bus adapter with GUID ' + RTRIM(CAST(@HostBusAdapterID AS nvarchar(50)))

DECLARE @iSCSITargets TABLE
(
TargetID GUID
)
INSERT INTO @iSCSITargets (TargetID)
SELECT TargetID FROM [dbo].[tbl_ADHC_ISCSIHbaToTargetMapping]
WHERE ISCSIHbaID = @HostBusAdapterID

PRINT N'Deleting iSCSI host bus adapter to target mapping for mapping for host bus adapter with GUID ' + RTRIM(CAST(@HostBusAdapterID AS nvarchar(50)))

DELETE FROM [dbo].[tbl_ADHC_ISCSIHbaToTargetMapping]
WHERE ISCSIHbaID = @HostBusAdapterID

PRINT N'Deleting iSCSI host bus adapter with GUID ' + RTRIM(CAST(@HostBusAdapterID AS nvarchar(50)))

DELETE FROM [dbo].[tbl_ADHC_HostInternetSCSIHba]
WHERE ISCSIHbaID = @HostBusAdapterID

PRINT N'Deleting iSCSI targets for host bus adapter with GUID ' + RTRIM(CAST(@HostBusAdapterID AS nvarchar(50)))

DECLARE @iSCSITargetIDCursor CURSOR;
DECLARE @iSCSITargetID GUID;
SET @iSCSITargetIDCursor = CURSOR FOR
(SELECT TargetID FROM @iSCSITargets)

OPEN @iSCSITargetIDCursor

FETCH NEXT FROM @iSCSITargetIDCursor INTO @iSCSITargetID

WHILE (@@FETCH_STATUS = 0)
BEGIN

PRINT N'Deleting iSCSI targets with GUID ' + RTRIM(CAST(@iSCSITargetID AS nvarchar(50)))

DELETE FROM [dbo].[tbl_ADHC_ISCSITarget]
WHERE TargetID = @iSCSITargetID

FETCH NEXT FROM @iSCSITargetIDCursor INTO @iSCSITargetID
END

CLOSE @iSCSITargetIDCursor
DEALLOCATE @iSCSITargetIDCursor

FETCH NEXT FROM @HostBusAdapterCursor INTO @HostBusAdapterID
END

CLOSE @HostBusAdapterCursor
DEALLOCATE @HostBusAdapterCursor

PRINT N'Completing host bus adapters deletion'

DELETE FROM [dbo].[tbl_ADHC_HostBusAdapter]
WHERE HostID = @DeleteHostId

PRINT N'Prepairing to delete agent servers'

DECLARE @AgentServerID  GUID;
SET @AgentServerID =
(
SELECT AgentServerID FROM [dbo].[tbl_ADHC_AgentServerRelation]
WHERE HostLibraryServerID = @DeleteHostID
)

PRINT N'Deleting agent server relations'

DELETE FROM [dbo].[tbl_ADHC_AgentServerRelation]
WHERE HostLibraryServerID = @DeleteHostID

PRINT N'Deleting health monitor data for agent server with GUID ' + RTRIM(CAST(@AgentServerID AS nvarchar(50)))

DELETE FROM [dbo].[tbl_ADHC_HealthMonitor]
WHERE AgentServerID = @AgentServerID

PRINT N'Deleting agent server with GUID ' + RTRIM(CAST(@AgentServerID AS nvarchar(50)))

DELETE FROM [dbo].[tbl_ADHC_AgentServer]
WHERE AgentServerID = @AgentServerID

PRINT N'Deleting host GPUs'

DELETE FROM [dbo].[tbl_ADHC_HostGPU]
WHERE HostID = @DeleteHostId

PRINT N'Deleting host'

DELETE FROM [dbo].[tbl_ADHC_Host]
WHERE HostID = @DeleteHostId

IF (@HostClusterID IS NOT NULL)
BEGIN

PRINT N'Checking to see if any other hosts are joined to the same cluster'

DECLARE @HostCount INT;
SET @HostCount =
(
SELECT COUNT(*) FROM [dbo].[tbl_ADHC_Host]
WHERE HostClusterID = @HostClusterID
)

PRINT N'There are ' + RTRIM(CAST(@HostCount AS nvarchar(50))) + N' currently joined to the same cluster'

IF (@HostCount = 0)
BEGIN

PRINT N'Deleting cluster disks'

DELETE FROM [dbo].[tbl_ADHC_ClusterDisk]
WHERE ClusterID = @HostClusterID

PRINT N'Deleting cluster'

DELETE FROM [dbo].[tbl_ADHC_HostCluster]
WHERE ClusterID = @HostClusterID
END
ELSE
PRINT N'This host is not the last host in the cluster, the cluster will be deleted upon the deletion of the last host.'
END
ELSE
PRINT N'This host does not belong to a cluster, no clusters will be deleted'

GO
And that’s it 🙂
I have tried this script a couple of times and it has working well for me.
But please do not hesitate to leave a comment in case there is anything that’s not working for you.
Edit: Thanks to Yusuf Ozturk the script now also supports deleting Pass-through Disks and Virtual Switch Extensions in case they were used by the hosts.

